


In the previous Part, we set up our infrastructure. If you haven’t read it yet, I request you to do so in order to get a better understanding of the project. I will give the link below.
https://medium.com/@satishankalap96/ci-project-part-1-fb2683f5acb1
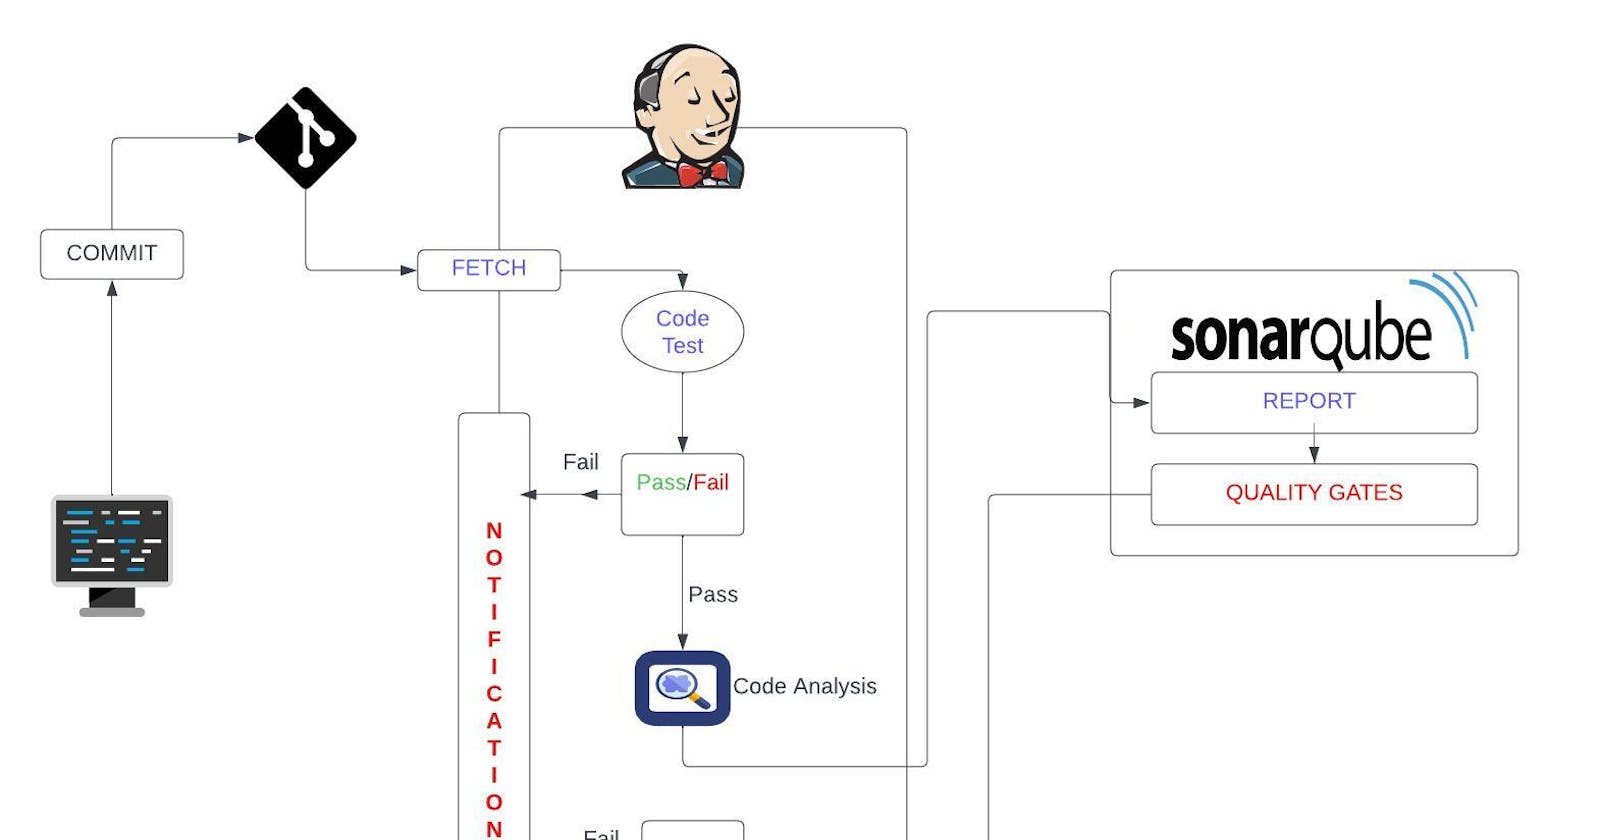
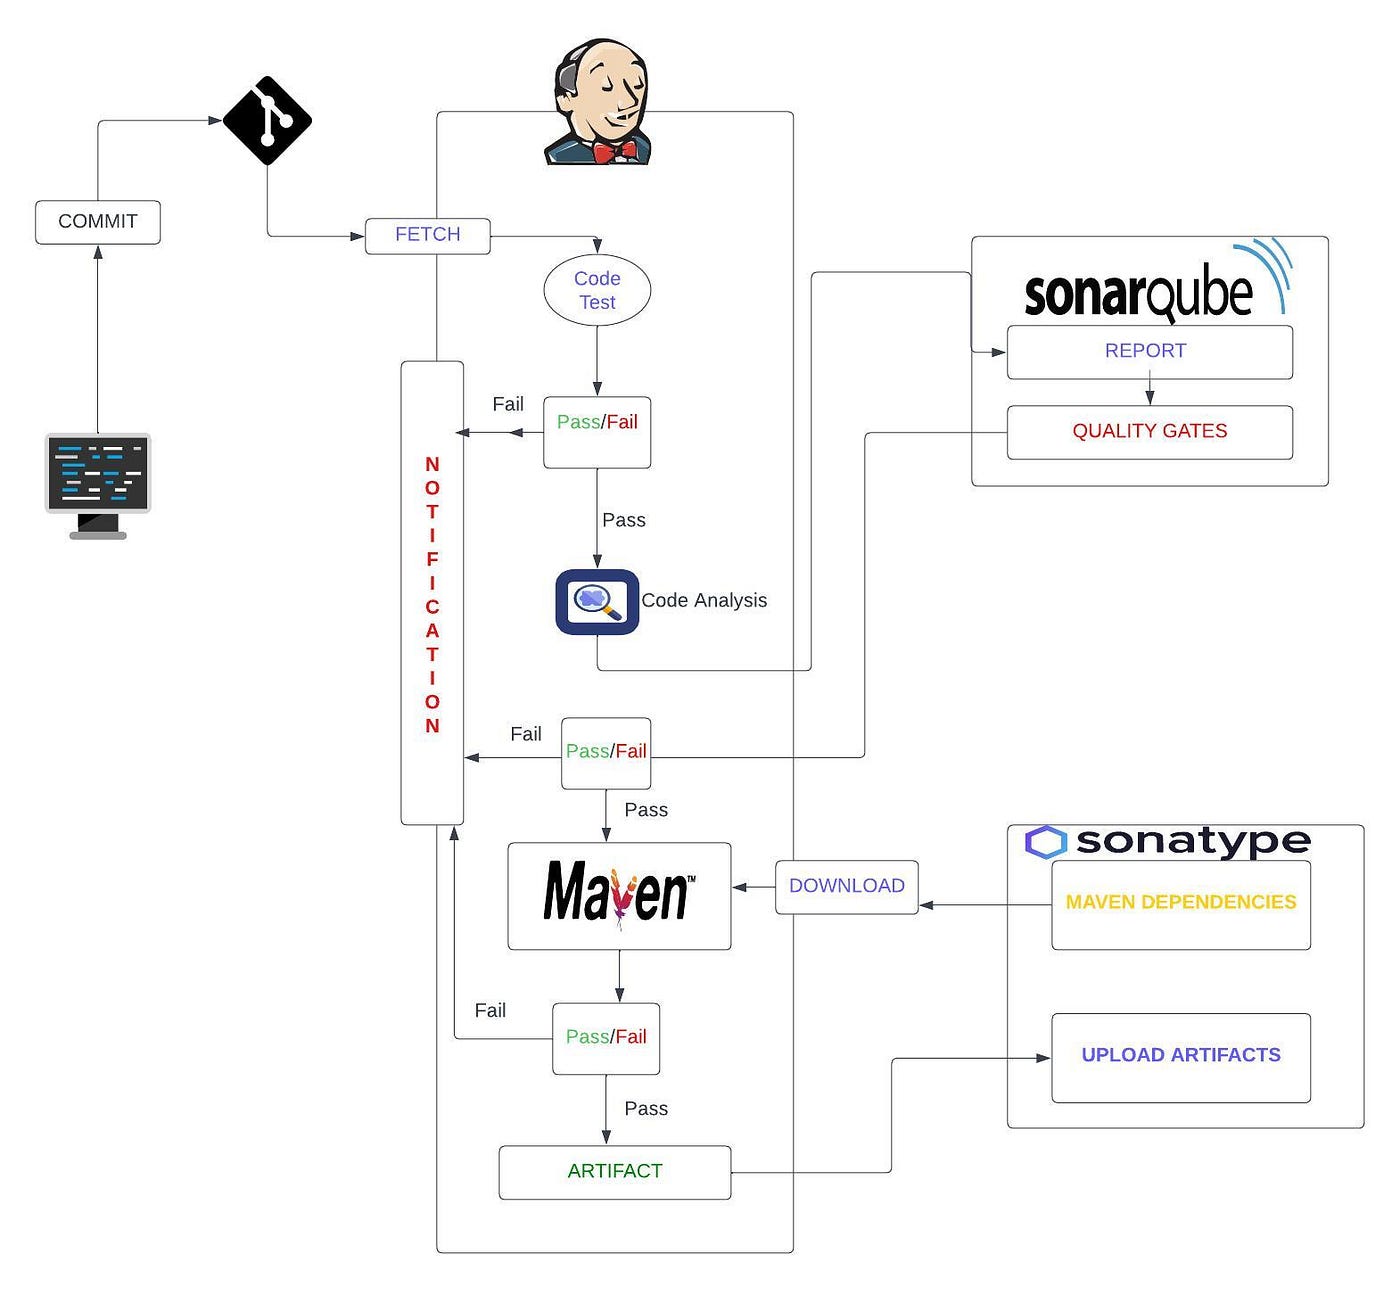
Architecture
Post Installation
Configuring Jenkins
Once done now SSH to Jenkins Instance and check the status of Jenkins.
sudo systemctl status jenkins
If the status is running then now go to EC2 Dashboard copy the public ip of Jenkins Instance and paste it on the browser with port <public ip of instance>:8080 this page will appear. Now go to Jenkins instance and copy this location


copy this password on the browser Administrator Password field and click on continue-> Install suggested plugins-> wait till it finish installing all the plugins-> now create your admin user and password. Once done save and continue it will take you to Jenkins Dashboard.

Now on the Jenkins Dashboard on the left side you will see manage Jenkins click on it -> plugins -> Available -> Search and select Maven Integration, Github Integration, Nexus Artifact Uploader, SonarQube Scanner, Slack Notification and Build Timestamp (for versioning our Artifact).-> click on install without restart and wait till download progress is success.


Configuring Nexus
Now go to EC2 Console and SSH to Nexus Instance.
sudo systemctl status nexus.service
If you see the instance is not running then create a .sh file copy the script of nexus-setup.sh into it and give executable permission and run the script from the instance and then check the status.
sudo vim nexus.sh
sudo chmod +x nexus.sh
Once the status is running then now go to EC2 Dashboard copy the public ip of Nexus Instance and paste it on the browser with port <public ip of instance>:8081
Now you can see the Nexus Dashboard, click on sign in -> Enter username as Admin and for password go to the location mention here and do
cat /opt/nexus/sonatype-work/nexus3/admin.password
Copy the password and paste it in the password field.

Now you can create your own password and make sure you Disable the anonymous process, we don't want anyone to upload or download the artifact to Nexus Server and click on Finish.
We will be creating in total four Repositories.
Now Click on Settings on top of the Dashboard -> Repositories -> Create Repositories -> Select Maven2 (hosted) -> name=release -> Create repository
Create Repositories -> Select maven2 (proxy) -> name=central -> Proxy Remote Storage add url =https://repo1.maven.org/maven2/ -> Create repository.
Purpose of this Repository is to store dependencies and Maven tool in jenkins will download dependencies from this Repository.

Now create another Repository for Snapshot. Create Repositories -> Select Maven2 (hosted) -> name=snapshot -> Change Version Policy to Snapshot → Create repository

Now Create last Repository i.e Group Repository Create Repositories -> Select Maven2 (group) -> name=group -> Goto Group and add all 3 newly created Repositories to Members → Create repository.

We have successfully created 4 Repositories on Nexus Server.
Configuring SonarQube
SSH to Sonar Instance and check the status of sonar service
sudo systemctl status sonar.service
If you see the instance is not running then create a .sh file copy the script of sonar-setup.sh into it and give executable permission and run the script from the instance and then check the status.
sudo vim sonar.sh
sudo chmod +x sonar.sh
Once the status is running then now go to EC2 Dashboard copy the public ip of Nexus Instance and paste it on the browser with port <public ip of instance>
Click on Sign in → Username and Password will be admin. Make sure you change the password for SonarQube. This is how the SonarQube Dashboard look's like.

Build Job
Before we run our job, we make sure that JDK and Maven are installed in Jenkins.
Goto Jenkins → Manage Jenkins → Global Tool Configuration → JDK → Add JDK → Name= OracleJDK8 → /usr/lib/jvm/java-1.8.0-open.jdk-amd64. add this path to JAVA_HOME
To get this path /usr/lib/jvm/java-1.8.0-openjdk-amd64
SSH to Jenkins and install JDK8
sudo apt update
sudo apt install openjdk-8-jdk -y
we will now have 2 versions of JDK installed in Jenkins Server to check that goto,
cd /usr/lib/jvm
(By default we have installed JDK 11 with Jenkins, so now we will install JDK 8 and specify the path in JAVA_HOME).

Now scroll down and go to Maven field, Add Maven → Name =MAVEN3 → check on install automatically → select version =3.8.6 → Save

Now we have to save Nexus login credentials in Jenkins, so that Jenkins will login and store our artifact in Nexus.
Todo that we have to click on manage jenkins → manage credentials → jenkins/system → Global credentials → Add credentials → username and password should be Nexus Credentials → Create
If you have clone the code into your Github Repository then make changes in the Jenkinsfile → Environment → NEXUS_URL should be your Nexus Instance Private IP and if you have created the Nexus Repo's as the same name I have mentioned while creating Repositories than that's ok but if you have changed any then you have to give the same name in NEXUS_REPOSITORY & NEXUS_REPOGRP_ID.

Now time to create our job, Goto Jenkins Dashboard → new item → name=ci-pipeline → Select Pipeline → ok → scroll down and in pipeline field select pipeline script from SCM → In SCM select Git → Give your Github Repository URL → Give Branch name=*/job-nexus → Save
As we are using public Github Repository we don't need to add credentials, if you have private Github Repository then you have to mention your credentials.
NOTE: For each stage I have different branch you can see the code extension, so if you have clone my Github repo make sure you use the same branch name as mentioned.

Now time to build the Job, click on Build Now and wait for the Job to execute and you can also view the output by clicking on the running job → console output.

Every time you go make changes in your code you have to come to Jenkins and click on Build now but again this is manual process, As a DevOps Engineer we have to automate all the possible ways we can so to automate this process we use Github WebHook.
GitHub WebHook
To automate Build now process in Jenkins, go to your Github Repository → settings → webhooks → Add Webhook → Copy & Paste your Jenkins Instance Public Ip with Port i.e http://<public-ip>:8080/github-webhook/ → content type =application/json → Add Webhook.

To check whether it's configured correctly or not go to recent deliveries on Github Webhook if there is check mark that means Jenkins is responding to our Repository , if it is red or not checked then make sure you have given correct Ip of your Jenkins Instance. As we are not using Elastic Ip for our Instances Ip will change when we stop/start Instance so make sure you configure it accordingly.

Now go to Jenkins Job → configure → Build Trigger → Select Github Hook Trigger → Save

All the configurations are done, now time to write the code and build the job. (you can find this code in github-webhook branch in my Github Repo just copy that code in your Jenkinsfile and commit and push it will automatically start the Jenkins Job)

Here in the Test stage we do unit test which generate reports and in the checkstyle stage it will analysis the code and also generate reports you can see all this reports in target directory which is inside the workspace. You can see surefire-reports and checkstyle-result.xml this are not human readable reports, so we need some tool that can store this reports analyse it and present it in a proper format and that is where we have SonarQube Server. We have setup SonarQube Server now we need to write the code which scans and generate the reports and upload it to the sonarqube server, in order to do that we need 2 tools in Jenkins i.e Sonar Scanner (which scans the code) and SonarQube Server Info in Jenkins so that Jenkins will know where to upload. To configure this tools jump in to code analysis with SonarQube section.

Code Analysis with SonarQube
Now go to Jenkins Dashboard → configure system → Go to SonarQube Servers → check Environment Variables → Name= sonarserver → URL=http://<private-ip of sonar instance> → server authentication token generate and paste here
How to Generate Server Authentication Token
Go to SonarQube Server → Profile → My Account → Security → Generate Tokens , Give some name and click on Generate. Copy the token and make sure you save it somewhere safely and also paste it in the server authentication token initially it will not show you the token name to select so save that first and go back to this location again configure system → Go to SonarQube Servers -> server authentication token click on add it will show jenkins select it → kind = secret text and past the token in secret and Add → Save. (Make sure you select the token)

Also we need Sonar Scanner Go to Jenkins Dashboard →Manage Jenkins → Tools → SonarQube Scanner → Name=sonarscanner → Install Automatically → Save

All the configurations are done, now time to write the code and build the job.(you can find this code in code-analysis-sonarqube branch in my Github Repo just copy that code in your Jenkinsfile and commit and push)

After the Build Job is successful, you can go to SonarQube Server Dashboard and see our project there. As we can see here the quality is passed everything is good because it has is own Quality Gates but you may have certain rules for your projects and you need to create your own Quality Gate so we will see how to create a Quality Gate and assign that to our our project.

Sonar Quality Gates
Creating Quality Gate and Assigning it to our project.
Go to SonarQube Dashboard → Quality Gates → Create Quality Gate → Name= CIQG → Add Condition → Scroll down and select Bugs and give the value greater than 35 → Create. Once the Quality Gate is Created attach it to our Project. Click on Projects → Project Settings → Quality Gates → Select CIQG. Now we have successfully attached Quality Gates which means Jenkins will upload the report to SonarQube server and wait for Quality Gate result but how does SonarQube know where's Jenkins to send the result, so we have to fix this through webhook.

Go to Projects → Project Settings → Webhook → Create give name CIWebhook and in the URL section add http://<private IP of Jenkins>:8080/sonarqube-webhook → Create

All the configurations are done, now time to write the code and build the job.(you can find this code in sonar-quality-gates branch in my Github Repo just copy that code in your Jenkinsfile and commit and push)

The build job is successful, we have tested our code in many ways like unit test, checkstyle, sonar scanner and we see our Artifact is good now and it's time to upload our Artifact to Nexus Server.
Upload Artifact to Nexus Repository
We know that we are archiving the Artifact and that's stored in workspace → target directory, now we have to upload our Artifact into the Nexus release repository that we have created earlier. Every time when we upload a new Artifact it should have a new Version number and the best approach for that is Time Stamp. We have already installed a plug-in in Jenkins i.e Build Time Stamp we need to set it's value for that go to Jenkins Dashboard → Manage Jenkins → System → Scroll down you will see Build Timestamp plug-in change the value here and Save.

Now all set we have to write some code again to upload this Artifact to Nexus Repository and build the job. (you can find this code in upload-artifact-nexus branch in my Github Repo just copy that code in your Jenkinsfile and commit and push)

As you can see my build job is successful and now we need to go to Nexus Server, click on Browse → release <Repository Name> → In QA directory you can see our Artifact which is versioned with Time Stamp. We can also download this Artifact from the Nexus Server.

We can setup Notification service here so that we don't need to come to Jenkins server to see the build result. where we are going to use Slack Notification tool you can use other tools as well like E-mail notifcations.
Slack Notification
We already installed Slack Notifcation plug-in in Jenkins so we need to create a Slack account and create a channel in that and integrate that with Jenkins and finally we write a code, where we add one stage to send notifications. To do this first go to browser search for Slack and create a account in it or simply sign in with your google account.
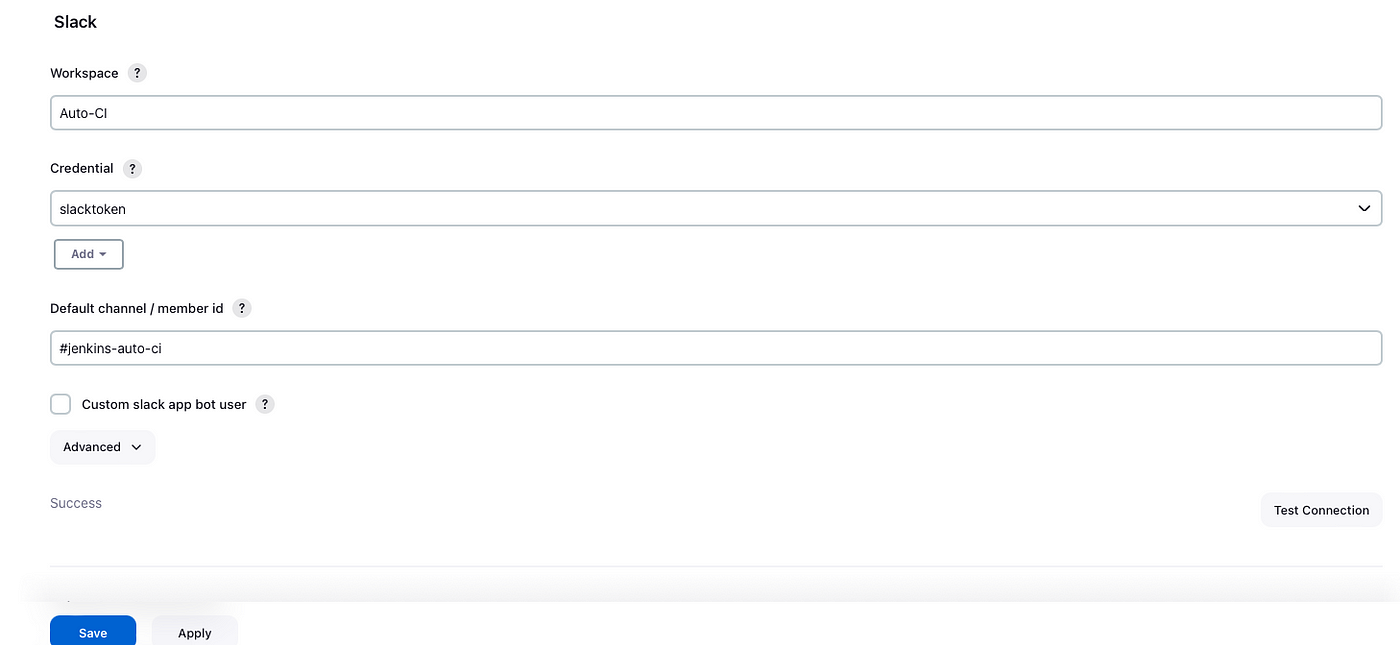
In Slack we have workspaces were this workspaces are used by a team of members to connect to it and in this workspace we have channels. So after logging into your Slack account → Create Workspace → Name= Auto-CI and it will ask for your name, profile, and what we are working on just give some information if you see option called skip you can skip this as well.
Now you will see Slack Dashboard on the left side you will see add channels → Create Channel → Name= jenkins-auto-ci → create → Add people= skip
So for Jenkins to authenticate with our Slack workspace we need to create a token in Slack for that we need to add a Jenkins App in Slack.
https://auto-ci.slack.com/intl/en-gb/apps
Use the above link search and select for Jenkins CI app → Add to Slack → select channel → click on Add Jenkins CI Integration. After adding this it will show the steps to configure but we are just here for the token, if you scroll down you can see the token just copy it and save the settings.

Now we will go back to Jenkins and do the integration. Jenkins Dashboard → manage Jenkins → system → Scroll down you will find Slack Plug-in → Workspace = Auto-CI → Add Credentials → Select secret text from kind and copy the slack token in secret → Add → Select slacktoken from credentials → add channel → click on test connection it should show success.

All the configurations are done, now time to add this information in the code and build the job if the job is success or failure it should send a notification on Slack Channel. (you can find this code in ci-jenkins branch in my Github Repo just copy that code in your Jenkinsfile and commit and push). Here my build job is successful and hopefully I should get the Notification in my Slack channel.


Boom there you go, I have recieved the notification saying it's success which means our code and configuration is working fine. Hope you all liked it, do let me know if you have any questions in the comments or you can also visit my LinkedIn profile.
LinkedIn : https://www.linkedin.com/in/satish-ankalap-295662125/
GitHub: https://github.com/satishankalap/ci-jenkins.git
Note: This is the Complete Continous Integration Project.