

Table of contents
- Automating Continuous Integration project, where each and every commit will build, test and generate artifact using the AWS Code Commit, Code Artifact, Code Build, Code Deploy, Code Pipeline and Sonar Cloud and also every commit result will be notified through AWS SNS to the Developers.
- Architecture
- Scenario:
- Issues:
- Solution:
- Benefits:
- AWS Services
- Flow of Execution
- Code Artifact
- Sonar Cloud Setup
- Code Build
- Quality Gates
- SNS
- Code Pipeline
Automating Continuous Integration project, where each and every commit will build, test and generate artifact using the AWS Code Commit, Code Artifact, Code Build, Code Deploy, Code Pipeline and Sonar Cloud and also every commit result will be notified through AWS SNS to the Developers.
You might have done a Continuous Integration project with Jenkins and tools, if not check out the link ( https://medium.com/@satishankalap96/ci-project-part-1-fb2683f5acb1 ) & ( https://medium.com/@satishankalap96/ci-project-part-2-6bf0a18815c ) where we need to take care of all the servers but here we use AWS Services for our Continuous Integration project where we will not manage any servers.
Architecture

Scenario:
Lets assume a bunch of developers in agile team make regular code changes, this code needs to be regulary build and tested. Usually build and release team will take care of such things or developers merge and integrate code.
Issues:
In this scenario the code changes frequently and the code is not so frequently tested by build and release team, even if the build and release team test and update, developers need to rework to fix these bugs and errors.
Solution:
Regular build and test for every commit not possible if the process is manual, so we have to automate this process and also developers should get notify for every build status.
Benefits:
Shorter mean time to repair
Works well with Agile Team
No Human Intervention
Fault Isolation
No operations over head
Here we use AWS Services to setup the code pipeline instead of Jenkins.
AWS Services
Code Commit ( Version Control System )
Code Artifact ( Maven will download dependencies from the code artifact )
Code Build ( To run build process )
Code Deploy ( Artifact deployment service )
Sonar Cloud ( SonarQube cloud based service tool )
Checkstyle ( Code Analysis from Build Job )
Code Pipeline ( Integrate all jobs together )
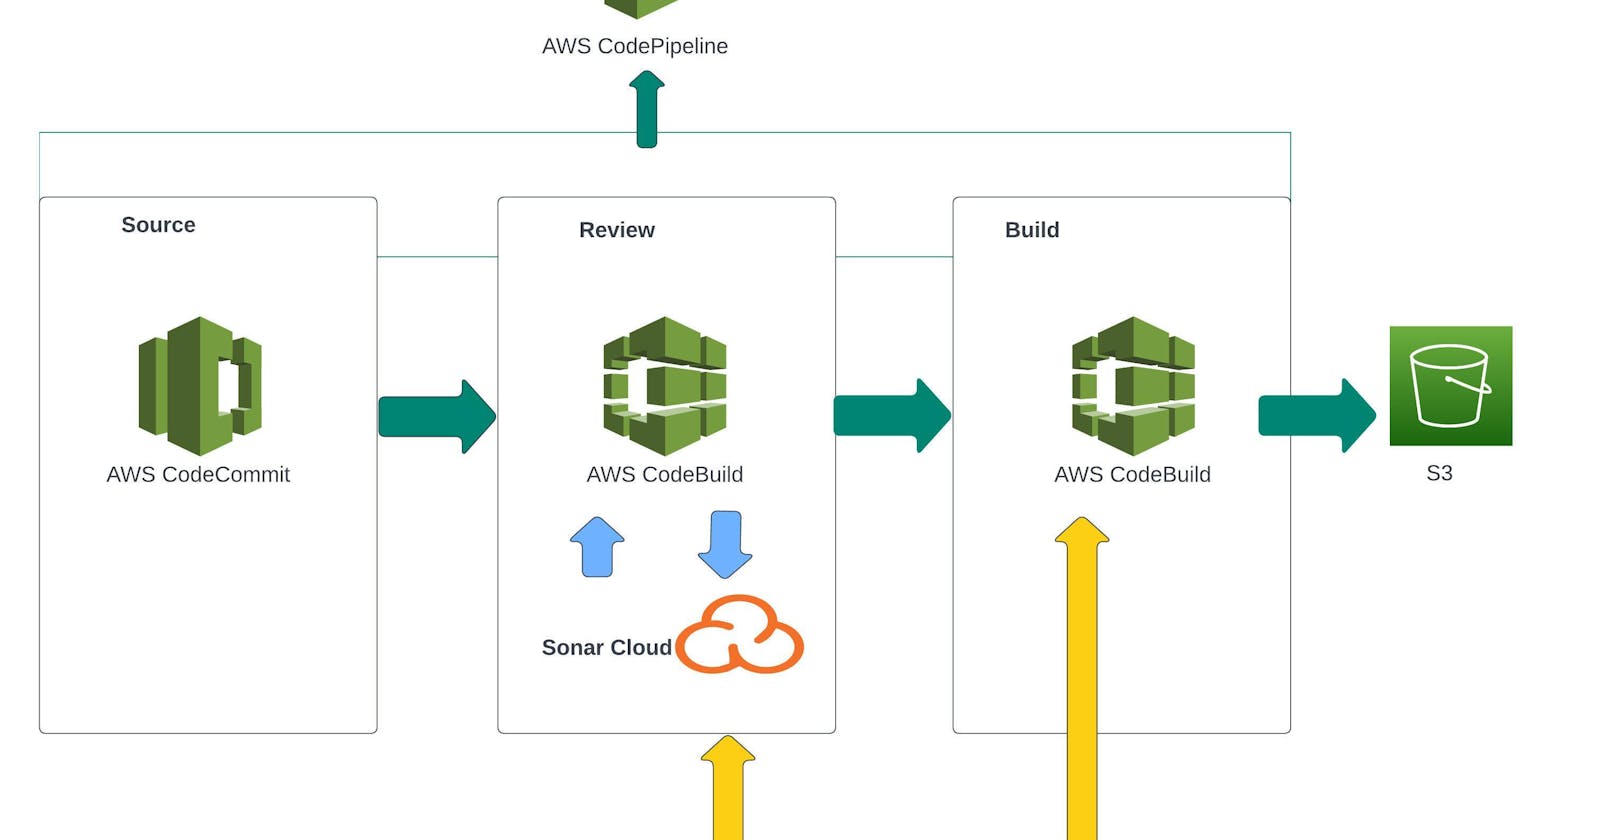
Flow of Execution
Login to AWS Account
Create Code Commit Repository
Create IAM User with Code Commit policy
Generate SSH Keys locally
Exchange keys with IAM User
Push source code from GitHub repo to Code Commit repo
Now create another IAM user for Code Artifact access
Install AWS CLI and configure
Export Auth Token
Update settings.xml and pom.xml file with repo details.
Create Sonar Cloud account
Generate Token
Create SSM Paramaters with Sonar details
Create Build Project
Update code build role to access SSM Parameters
Create Notifications for SNS
Build project is going to build the artifact and deploy it to S3 Bucket, so need to create S3 bucket.
Create Variables in SSM Parameters
Create Pipeline and test
So, now get started with our project. We follow all this steps accordingly to build your AWS-CI Project.
NOTE :Clone my GitHub Repo into your Local Machine and push that code to your Code Commit Repo. https://github.com/satishankalap/AWS-CI.git
Code Commit
Login to AWS Account and search for code commit → Create Repo → name = AWS-CI-Repo → Create and for connection steps we use SSH but before that we need IAM User
Go to IAM → Add User → name = AWS-CI-Admin → Give programatic access → Attach Policies → Create policy → Select Code Commit service → Actions enable all → Resources will be specific and add ARN,Region,Repo Name → Next → Review policy and create policy → Name = AWS-CI-Admin-Access → Create policy and then we have to attach this policy to IAM user i.e AWS-CI-Admin.

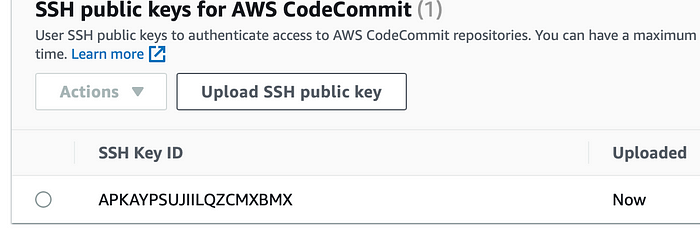
Now we will generate SSH keys in our local machine and also we create a config file in the same directory where we have generated our Public and Private keys.
ssh-keygen
cd /Users/satish/.ssh/
ls
You can see Public and Private keys here now copy the public key to our IAM Security Credentials → Select AWS-CI-Admin user → Security Credentials → upload ssh public key → and paste here the public key. After successfully uploading the public key you will get SSH key Id.
Now create a config file ( SSH will use this when we use code commit service, it's like we are telling SSH whenever Code Commit is host use this Access key ). After creating the config file paste the following script mentioned below. Make sure you give your SSD Key Id and correct name of your Private key. You can also get this script from my GitHub repo ci-aws branch in aws-files/ssh_config_file
vim config
chmod 600 config

Once done time to test the SSH Authentication use the below command and it should show the output saying successful authenticated over SSH.
ssh git-codecommit.us-east-2.amazonaws.com
Now we can clone our Code Commit repo using Clone SSH. For this project you can pull my GitHub repo and push that to your AWS Code Commit Repo. https://github.com/satishankalap/AWS-CI.git
git clone https://github.com/satishankalap/AWS-CI.git
git remote -v
git remote rm origin
git remote add origin <enter your Code Commit SSH Url>
git add .
git commit -m “push to AWS”
git push origin .
git push origin ci-aws
Once done go to your AWS Code Commit repo you can see the files.
Code Artifact
Maven build job will download dependencies from here, so we need to create a repo in Code Artifact.
Go to Code Artifact → create repo → name= AWS-CI-Maven-Repo → public upstream repo will select maven-central-store → select AWS Account → Domain= awsapp → create repository.

Now go to repositories in Code Artifact you will see 2 repos there one is for maven-central-store and another one is which we have created AWS-CI-Maven-Repo.

Now click on maven-central-store and view connection instruction → select mvn → from the step 3 we have to run this command which will give us a token but we need to run this command with IAM user for that we have to create another IAM user.

Go to IAM → Add User → name = AWS-CI-CodeArtifact → Give programatic access → Attach Policies → Select Code Commit Artifact Admin Access→ Add user → Download .csv
Now go to your terminal and use the below command to configure aws credentials (make sure you use the credentials that we have downloaded)

Now copy the command from code artifact view connection instruction step 3 and copy the output by using the below command and we need to create a SSM parameter to store this token . As of now store this token on your Notepad.
echo $CODEARTIFACT_AUTH_TOKEN
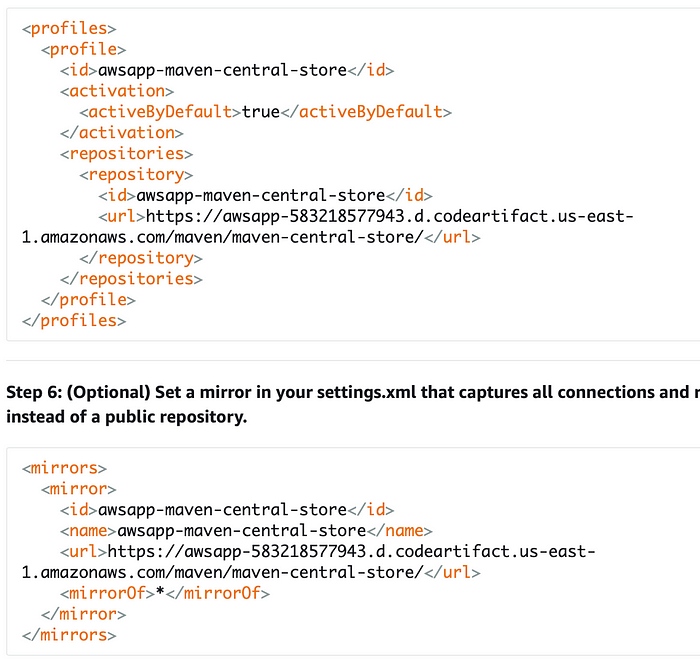
We also need to upadate settings.xml and pom.xml file i.e change the URL and domain name which we can get from view connection instruction steps, copy the url and domain name and paste it on line no 18,29 and 30 in settings.xml file and on pom.xml file copy and paste the url on line 213. Now we will setup sonar cloud.
Sonar Cloud Setup
Create account on sonarcloud.io or you can signup with your GitHub.
Once done go to my account → security → generate token → name= AWS-CI-Cloud → copy it and save on notepad.
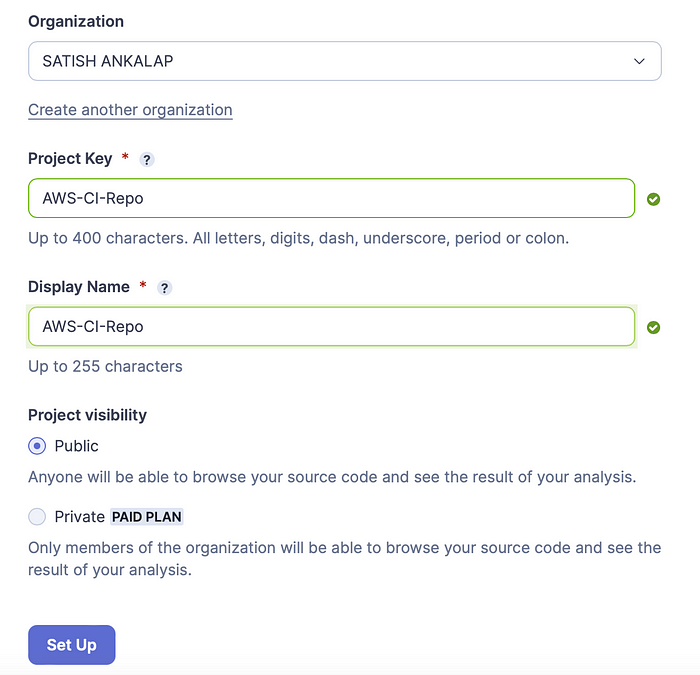
Now click on + symbol on left side of my account → Analyze new project (you can see all the projects if you signup with your Github but here for testing we use create a project manually) → Select your Organization and give project key and Display name → setup
So all these details like organisation, project, and sonar cloud url i.e host and token will be stored in AWS SSM. Now we have to create in total 5 Parameters of which 4 of them will be used for organisation, project, sonar cloud host and sonar cloud token and another 1 will be for the CODEARTIFACT_AUTH_TOKEN that we have generated in Code Artifact.
Now go to AWS and search for SSM ( Systems Manager ) → parameter store → name = organization → type is string → data type is text and value = <Select your Organization Name >
Similarly, we create for HOST and the value will be Sonar Cloud Url for project the value will be the project name and for sonartoken value will be token value that we have generated on sonar cloud and for this the type will be secure string. Finally we will create a parameter for the token we have generated for Code Artifact with name = Code-Artifact-Token → type will be secure string → and paste the token in value and create. You should see all the 5 parameters like this.

Code Build
Now go to AWS → code build → name= AWS-CI-Build → source provider will be AWS → Select Repository and Branch of Code Commit → OS = Ubuntu and Image will be 5.0 → new service role → Build Specifications → Insert Build Commands and click on switch to editor (we have build spec in aws-files/sonar-buildspec.yml inside ci-aws branch copy and paste that content here. If you have used the same names as mentioned above then you dont need to change anything if not you have to give the correct names in the values shown on below image ) → Logs → enable cloudwatch logs groupname = AWS-CI-Buildlogs and stream name= sonarbuildjob → create build project.

Now before we run or start build we have to give permissions for the new service role that we have created while creating build project. To find the role name you can click on edit in Build Projects and select Environment. Now go to IAM roles and search for that role and give permissions.
IAM roles → search for the role and attach policy → create policy → In service select Systems Manager → Action enable list and read and for Resources you can give specific ARN or select any → Review policy → policy name = AWS-CI-Sonarparameter-Access → Create
Now go to the role → Select the role and attach the policy we have created i.e AWS-CI-Sonarparameter-Access → Attach Policy
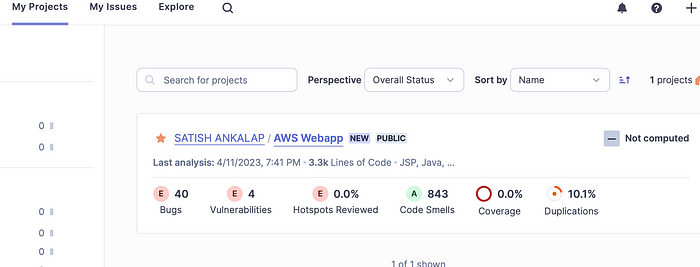
Once done now you can click on start build and also check the phase details. Once the build is successful you can got to code artifact repositories → select maven-central-store you can see all the dependencies stored there and from there build job is accessing the dependencies and also go to sonarcloud dashboard → my projects to see our project and bugs. Here in our project there is default Quality Gate setup by sonarcloud will see how to create and setup our own Quality Gates.
Quality Gates
Go to Sonar cloud dashboard → my projects → click on project → Quality Gates → create quality gate → name = AWS-CI-QG → add condition → search for bugs>45 Add condition and set as default. Now time to test this go back and run the build job again.

Now time to create another job which will build the artifact. Go to Create Build Project → Name = AWS-CI-Build-Artifact → Select Repository and Branch of Code Commit → OS = Ubuntu and Image will be 5.0 → new service role → Build Specifications → Insert Build Commands and click on switch to editor (we have build spec in aws-files/build_buildspec.yml inside ci-aws branch copy and paste that content here. If you have used the same names as mentioned above then you dont need to change anything if not you have to give the correct names in the values shown on below image ) → Logs → select the same name that we have created earlier and change stream name= buildjob → create build project.
So in this build it will build the artifact with timestamp (we have updated pom.xml for timestamp). This artifact than stored into S3 Bucket. And also we need to give the permission for the role.
IAM roles → search for the role and attach policy → Attach the policy that we have created for our first build i.e AWS-CI-Sonarparameter-Access → Add permissions.
Now we can start the build and test.

SNS
Go to AWS → Search for SNS → Topic → create topic → Name = AWS-CI-Notification → Create topic → Create subscription → protocol = email → endpoint will be your email → create subscription now go to your email and confirm.
Code Pipeline
Before we begin with Code Pipeline we will create a S3 bucket where we will be deploying the artifact to S3 bucket. Go to S3 → create bucket → name =aws-ci-build-artifactbucket → Create bucket → once done click on bucket and create a folder inside it with name = pipeline-artifact.

Create Pipeline → Name= AWS-CI-Pipeline → new service role → next → sourceprovider will be AWS Code Commit select repo and branch → next → build project will be code build → project name select project i.e AWS-CI-Build-Artifact → Deployer will be Amazon S3 → Bucket name will be aws-ci-build-artifactbucket and S3 object key is our folder inside the bucket pipeline-artifact → next → create pipeline once created stop execution and click on edit we have to add few more stages here.
edit → add stage → name=Test → edit action → name= Sonar-Code-Analysis → action provider = AWS Code Build →input artifact =source artifact → project name=AWS-CI-Build → Done
When you look at the pipeline this is how the sequence of stages should follow.

And in Deploy stage make sure you enable extract file before deploy option.

We are almost done, just need to setup integrate the SNS (Notifications) to Code Pipeline. Go to settings in code pipeline → notifications → create notification rule → name= AWS-CI-Pipeline-Notification → select events that trigger notification like failed, success or just simply select all for testing. → Targets → SNS topic and select the topic we have created in SNS and Submit.
Now time to test, Go to Code Pipeline and click on Release Changes and after the successful execution of code pipeline go to S3 and check whether it deployed the artifacts or not. If everything is well then go back to your terminal and make some changes in the code and push that to code commit and see it will automatically trigger the pipeline and send notification.


Any Queries just reach out on LinkedIn or mention your comments below.
LinkedIn : https://www.linkedin.com/in/satish-ankalap-295662125/
Note: This is the Complete AWS Continuous Integration Project.