

Automating Continuous Integration project, where each and every commit will build, test and generate artifact using the Jenkins, Nexus and SonarQube server and also every commit result will be notified through slack notification to the Developers
Scenario:
Lets assume a bunch of developers in agile team make regular code changes, this code needs to be regulary build and tested. Usually build and release team will take care of such things or developers merge and integrate code.
Issues:
In this scenario the code changes frequently and the code is not so frequently tested by build and release team, even if the build and release team test and update, developers need to rework to fix these bugs and errors.
Solution:
Regular build and test for every commit not possible if the process is manual, so we have to automate this process and also developers should get notify for every build status.
Process:
Input to this process will be any code commit and output will be tested artificat.
Benefits:
Shorter mean time to repair
Works well with Agile Team
No Human Intervention
Tools:
Jenkins (Continous Integration Server)
Git (Contains our Java Code)
Maven (To build this Java code we need maven)
Checkstyle (Code Analysis Tool)
Slack (To send notifications)
Nexus Sonartype (To Store artifact and also to download dependancies for maven)
Sonarqube Server (Code Analysis server will scan our code with sonarqube and publish result on sonarqube dashboard)
Here we use AWS EC2 to setup this Jenkins, SonarQube and Nexus servers.
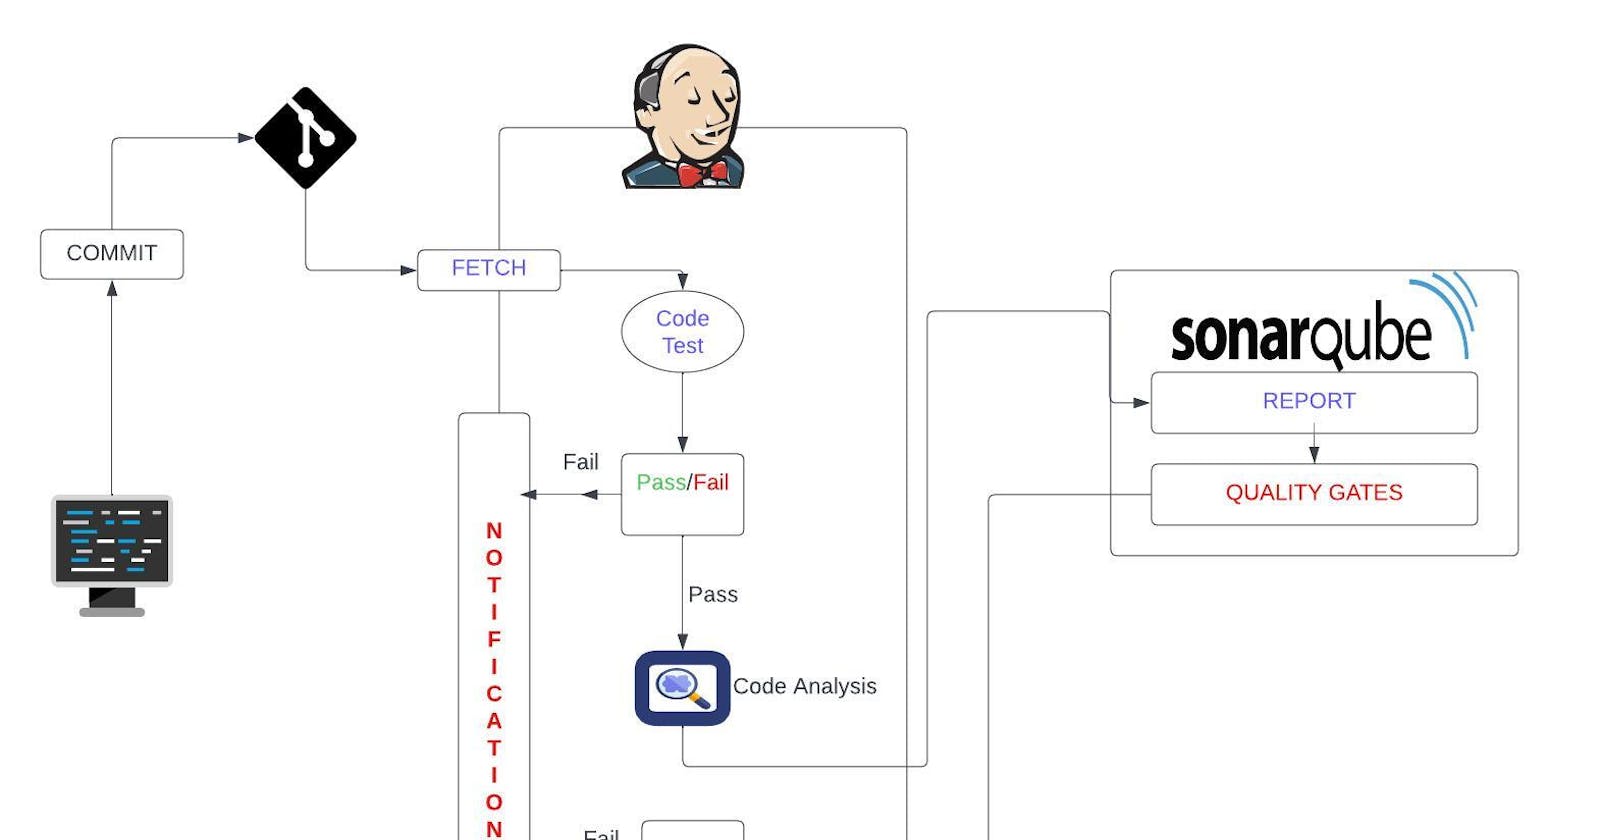
Architecture:
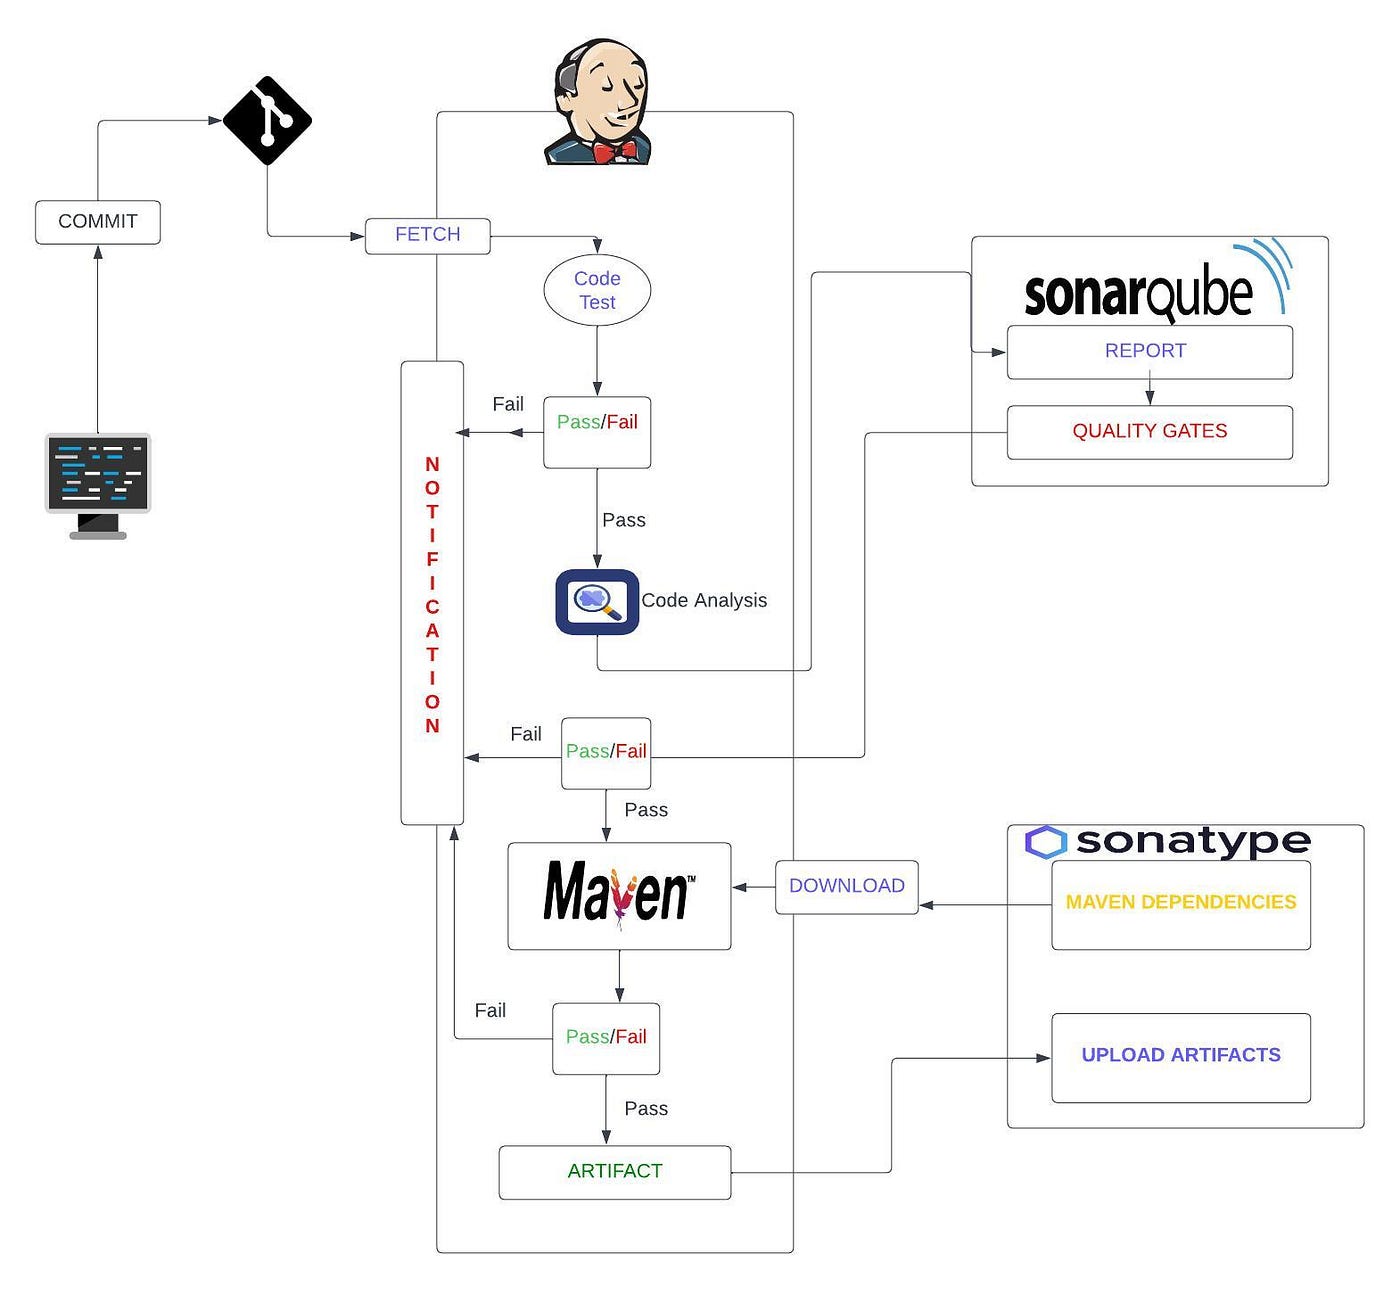
Steps :
Login to AWS Account
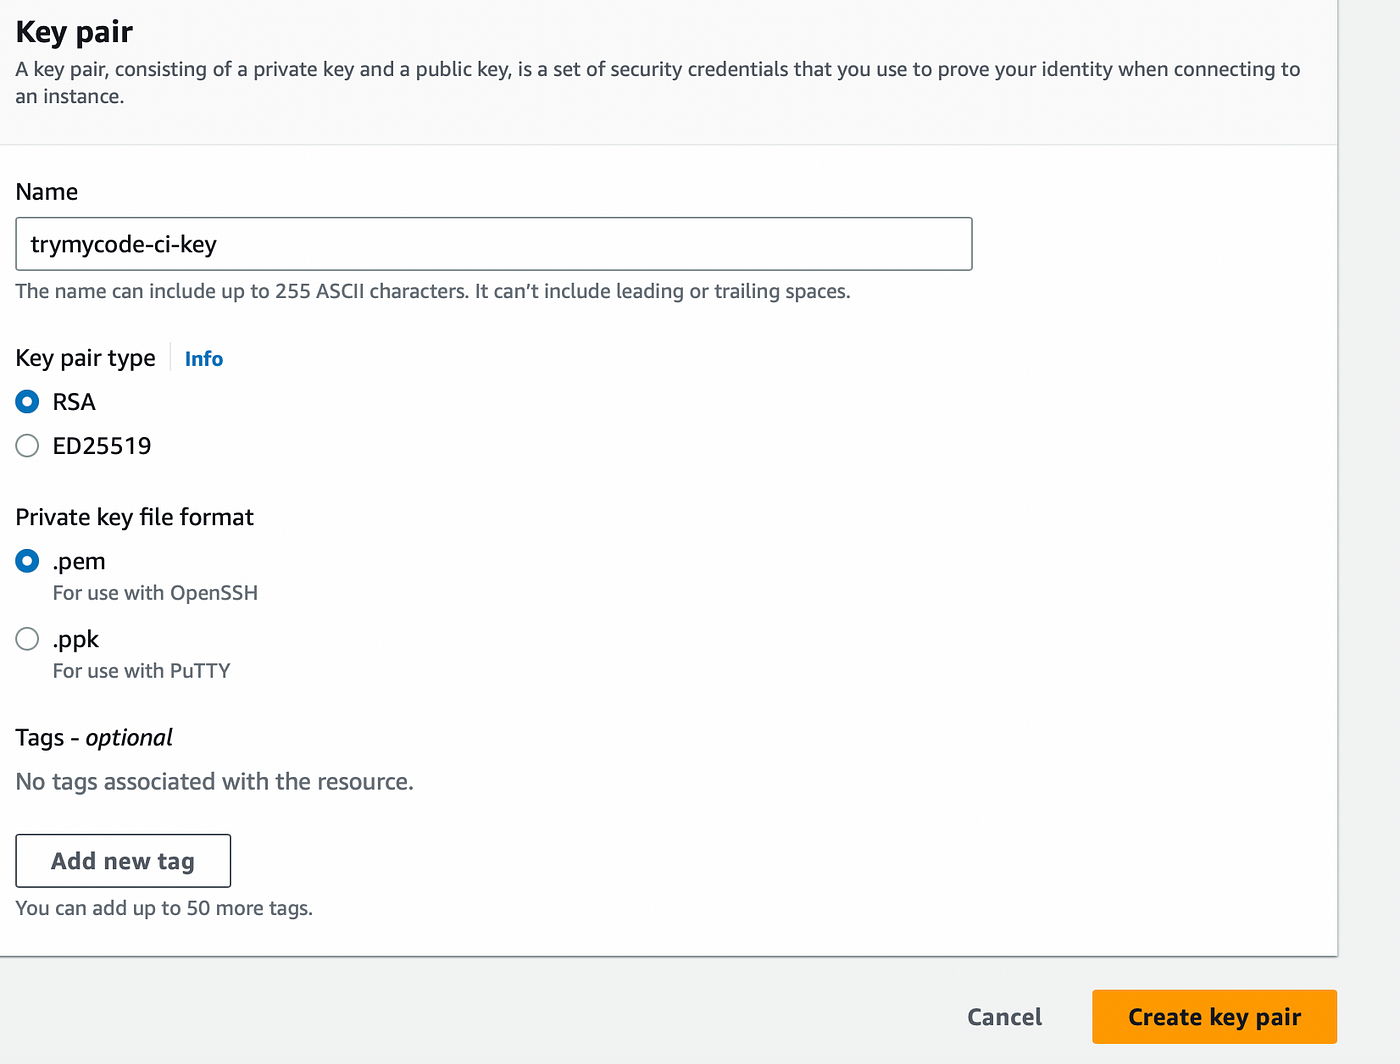
Create Key Pair
Create Security Group (Jenkins, Nexus and Sonarqube)
Create EC2 (Jenkins, Nexus and Sonarqube)
Post Installation (Jenkins setup and plugins), (Nexus and repository setup), (Sonarqube login test)
Git (Migrate Code)
Build Job with Nexus Intergration
Github Webhook (Whenever you make changes to your repo, Jenkins jon will trigger automatically)
Sonarqube server integration stage
Nexus Artifact upload stage
Slack Notification
So,now get started with our project. We follow all this steps accordingly to build your CI Project.
Login to your AWS Account
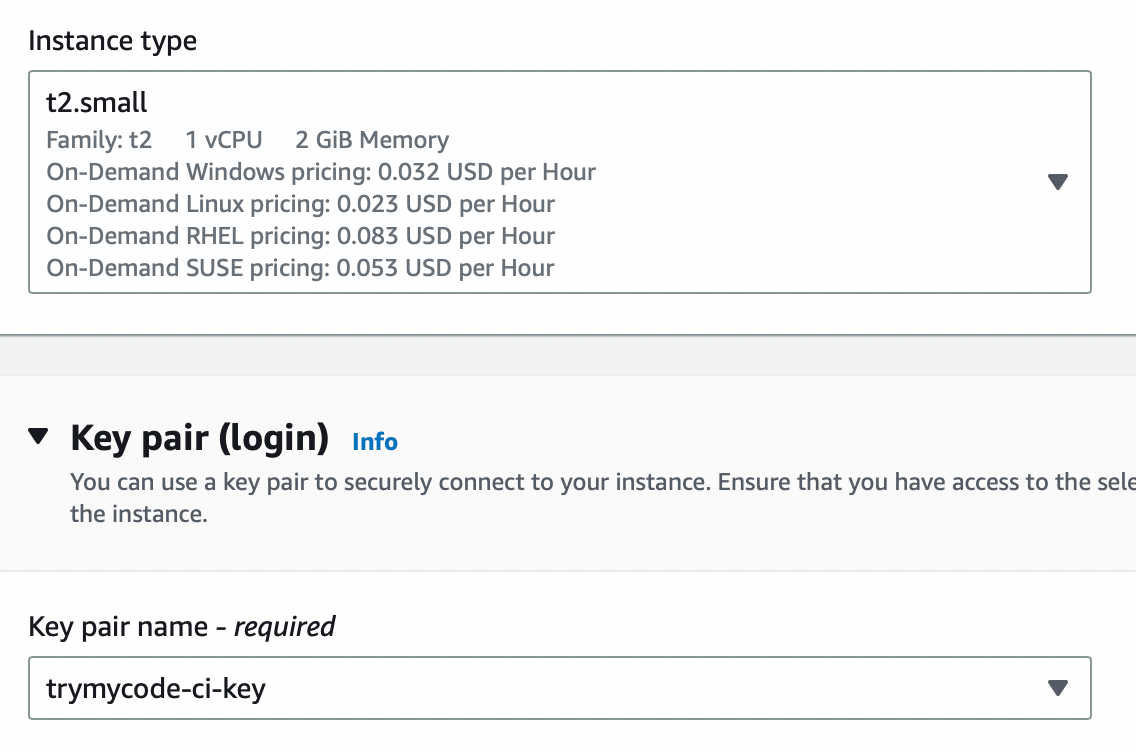
Create Key Pair, go to AWS EC2 -> key pairs -> Create Key Pair -> trymycode-ci-key.pem
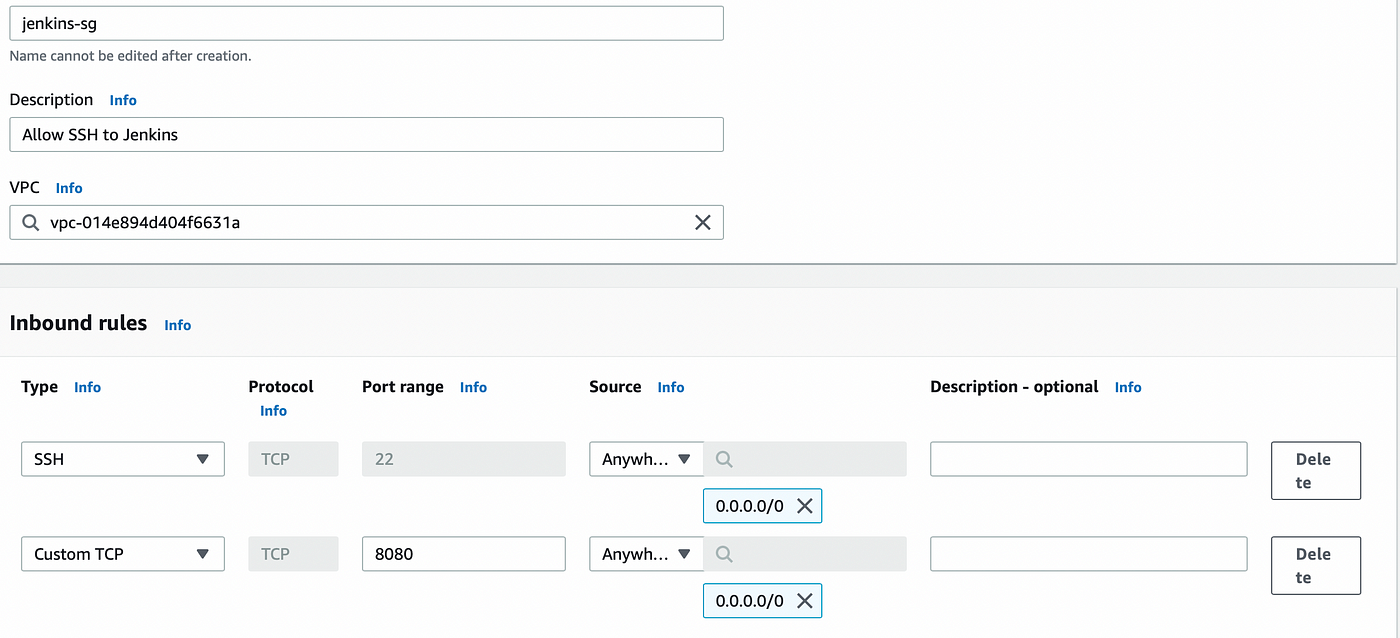
Create Security Group for 3 Servers i.e (Jenkins, Nexus and SonarQube)
go to AWS EC2 -> Security Groups -> Create Security Group
For <jenkins-sg> security group allow port 22 and 8080 from anywhere
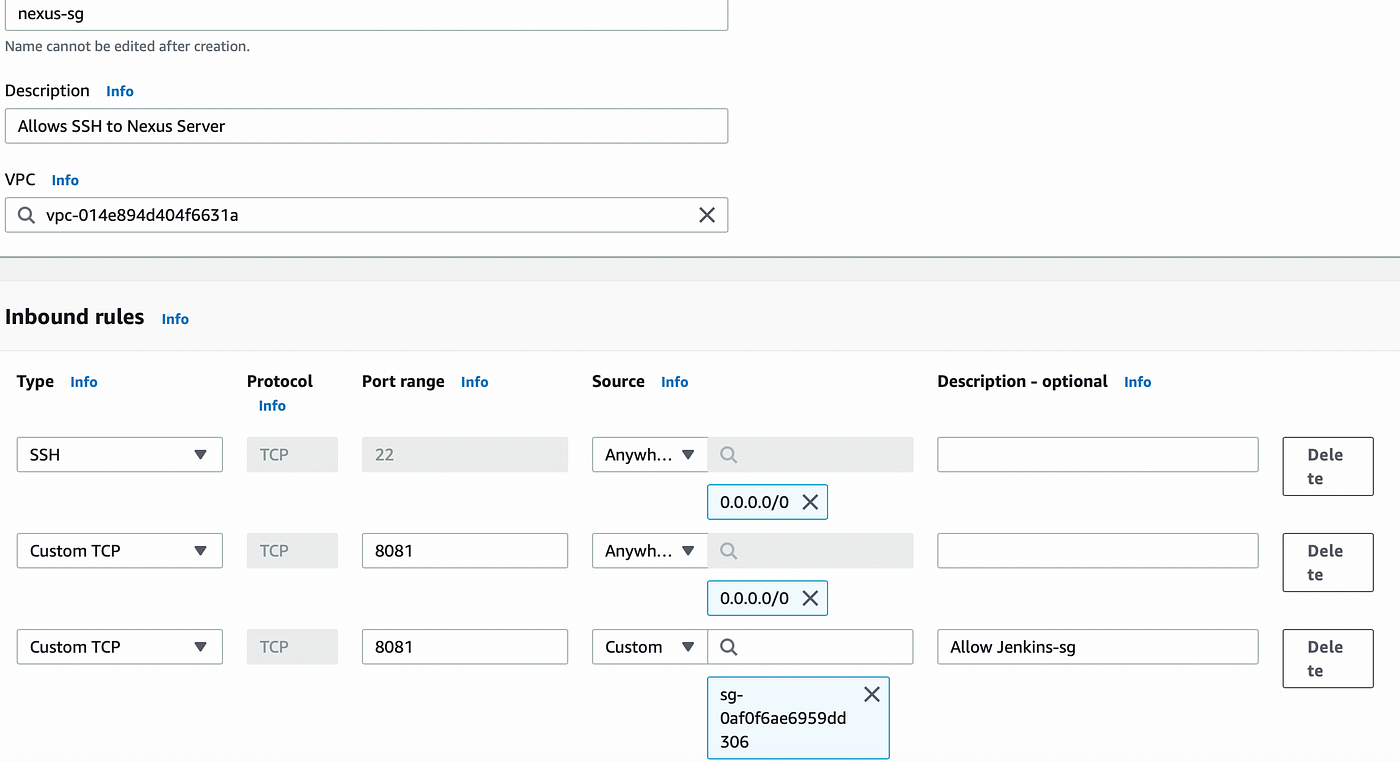
For <nexus-sg> security group allow port 22,8081 from anywhere and also allow 8081 from <jenkins-sg>
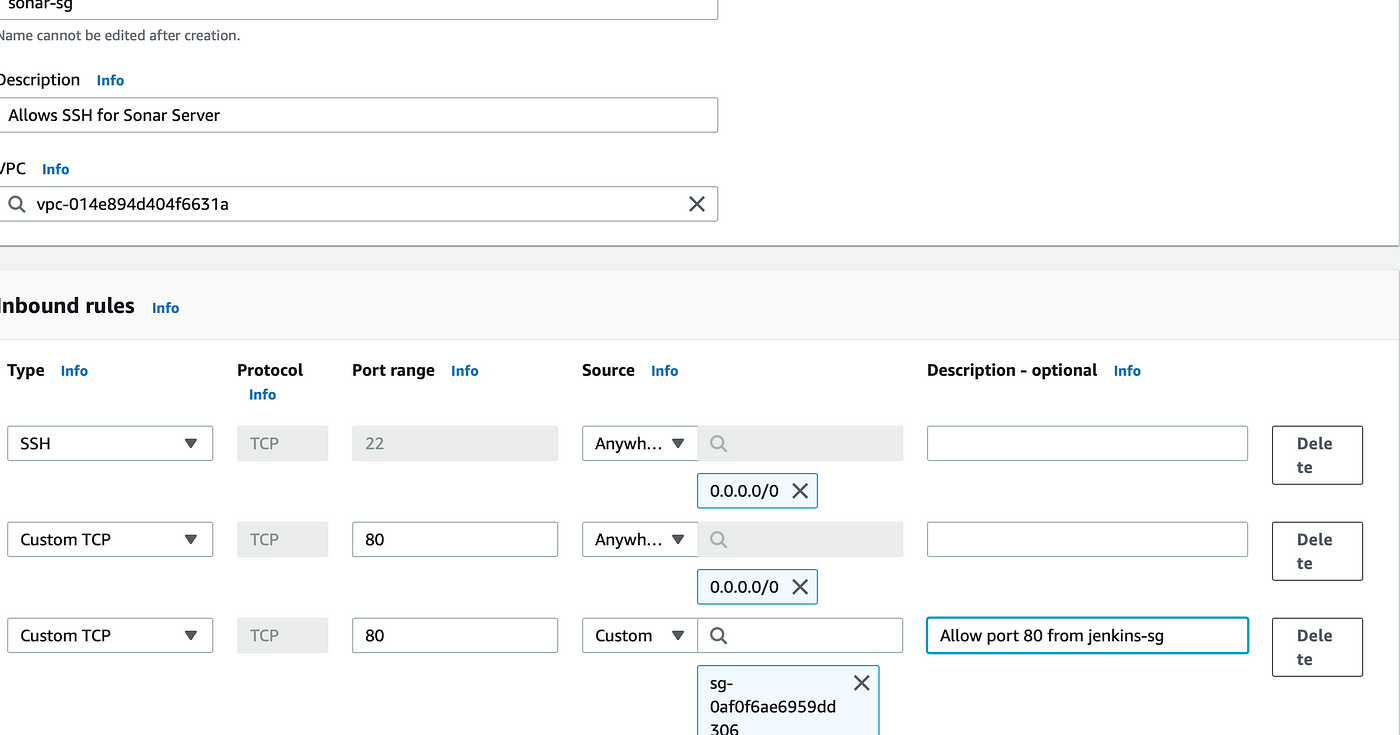
For <sonar-sg> security group allow port 22 and 80 from anywhere and also allow 80 from <jenkins-sg> . By default port 9000 is assigned to SonarQube server but we are setting Nexus server in the SonarQube Server which will listen on port 80.
Launching Instances
Now it's time to Launch our Instances. Here I am launching 3 Instances i.e (Jenkins, Nexus and Sonar).
Jenkins Instance
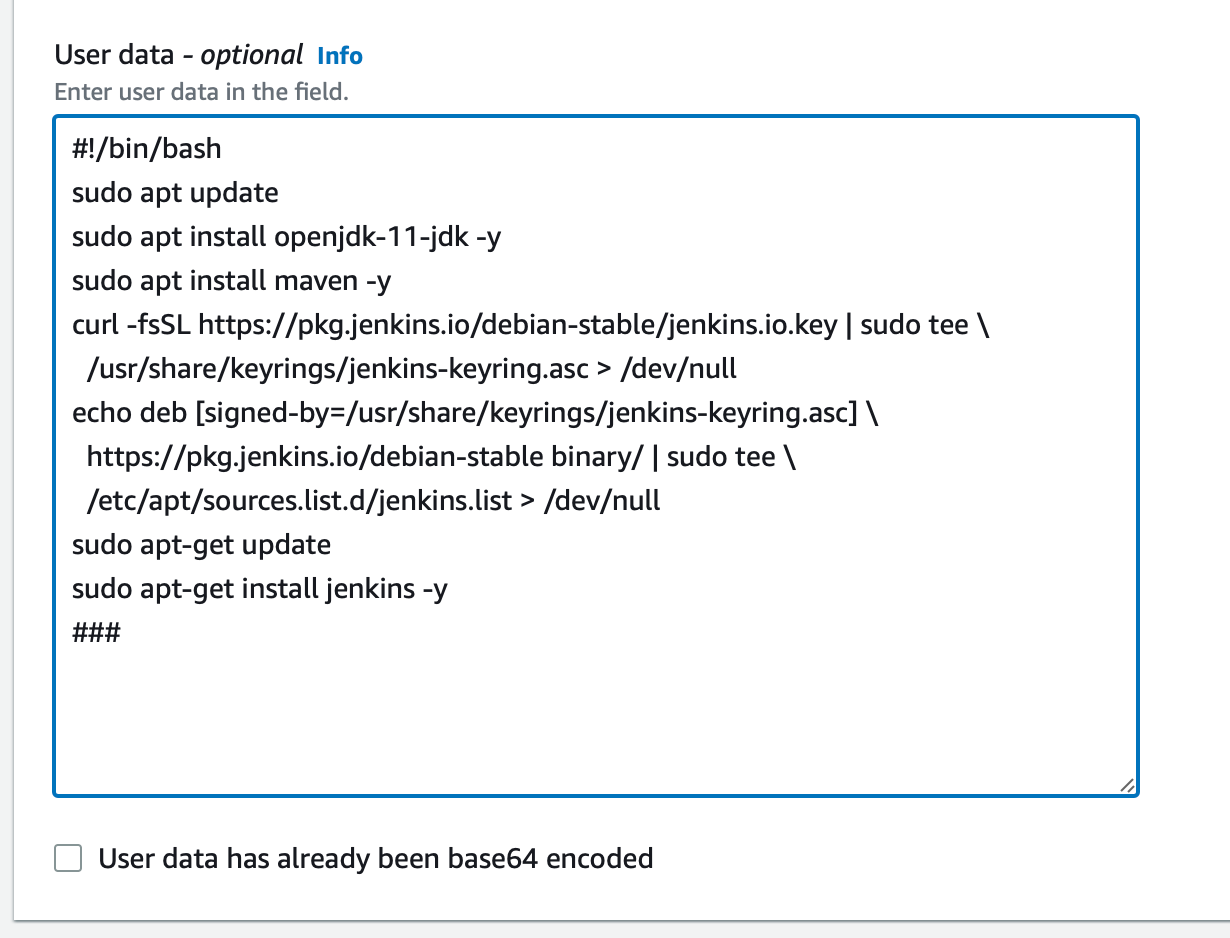
I am launching the Jenkins Instance with Ubuntu 20 operating system and with t2.small Instance Type, make sure you select the same key pair and security group that we have created earlier i.e (trymycode-ci-key) & (jenkins-sg) and copy this script in the user data named as jenkins-setup.sh of Jenkins instance or you can SSH to the instance create .sh file inside your instance copy this script into it and run from the instance. You can also get the script file in user data folder on my git hub repo i.e (https://github.com/satishankalap/ci-jenkins.git)
#!/bin/bash
sudo apt update
sudo apt install openjdk-11-jdk -y
sudo apt install maven -y
curl -fsSL https://pkg.jenkins.io/debian-stable/jenkins.io.key | sudo tee \
/usr/share/keyrings/jenkins-keyring.asc > /dev/null
echo deb [signed-by=/usr/share/keyrings/jenkins-keyring.asc] \
https://pkg.jenkins.io/debian-stable binary/ | sudo tee \
/etc/apt/sources.list.d/jenkins.list > /dev/null
sudo apt-get update
sudo apt-get install jenkins -y
###
Nexus Instance
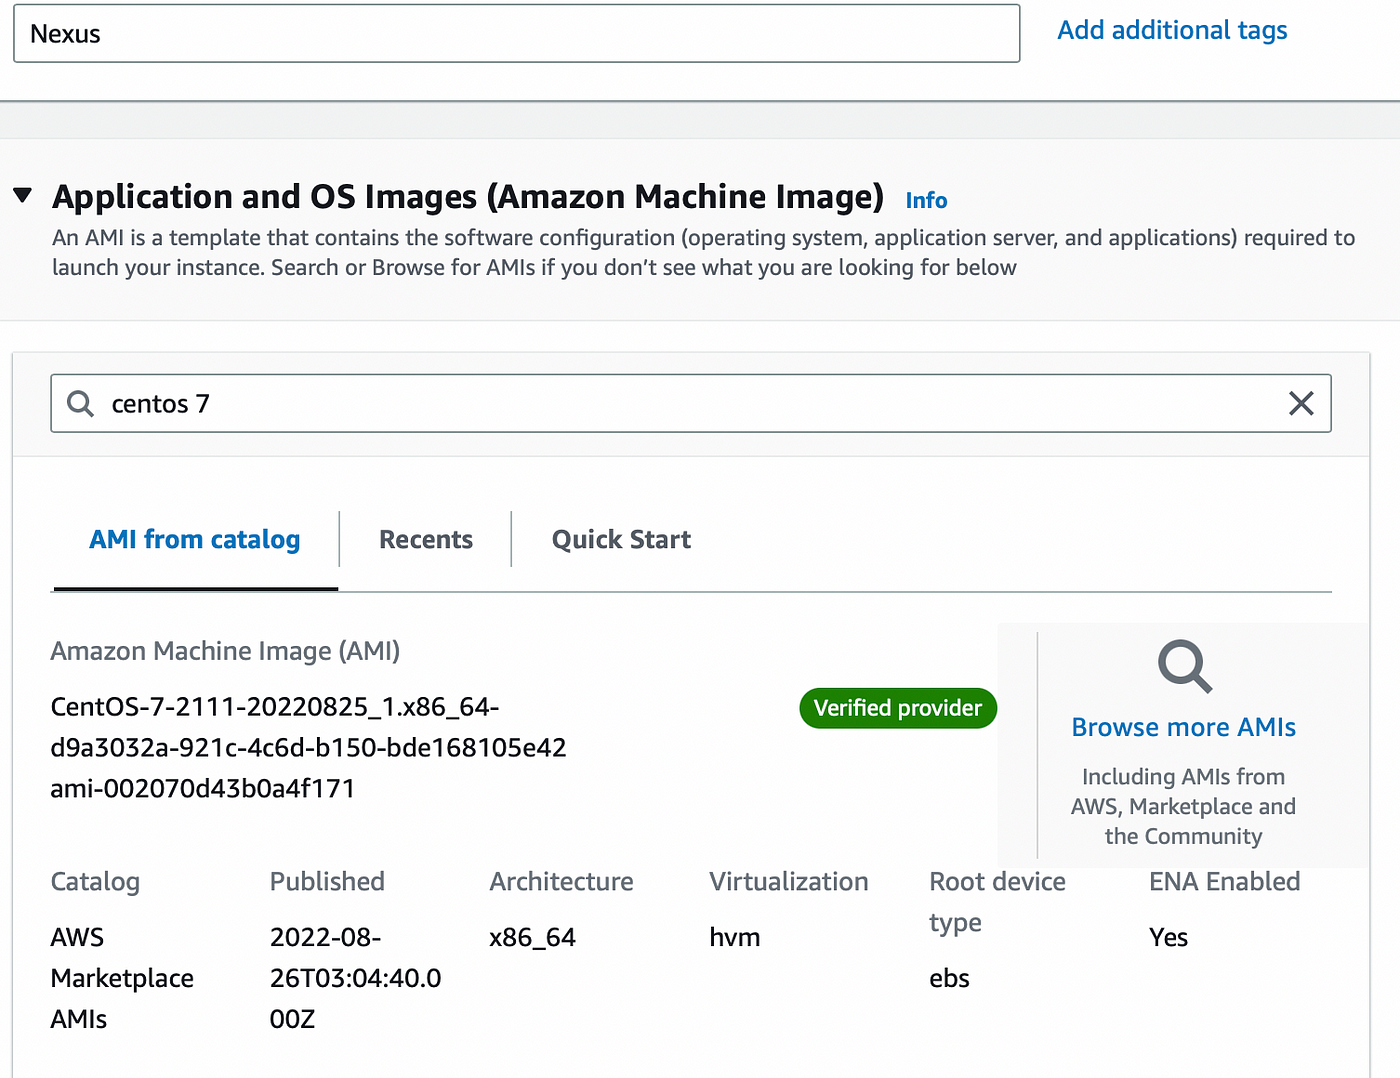
Now for Nexus Instance with Centos 7 operating system and with t2.medium Instance Type, make sure you select the same key pair and security group that we have created earlier i.e (trymycode-ci-key) & (nexus-sg) and copy this script in the user data named as nexus-setup.sh of Nexus instance or you can SSH to the instance create .sh file inside your instance copy this script into it and run from the instance. You can also get the script file in user data folder on my git hub repo i.e (https://github.com/satishankalap/ci-jenkins.git)
#!/bin/bash
yum install java-1.8.0-openjdk.x86_64 wget -y
mkdir -p /opt/nexus/
mkdir -p /tmp/nexus/
cd /tmp/nexus/
NEXUSURL=”https://download.sonatype.com/nexus/3/latest-unix.tar.gz"
wget $NEXUSURL -O nexus.tar.gz
EXTOUT=`tar xzvf nexus.tar.gz`
NEXUSDIR=`echo $EXTOUT | cut -d ‘/’ -f1`
rm -rf /tmp/nexus/nexus.tar.gz
rsync -avzh /tmp/nexus/ /opt/nexus/
useradd nexus
chown -R nexus.nexus /opt/nexus
cat <<EOT>> /etc/systemd/system/nexus.service
[Unit]
Description=nexus service
After=network.target
[Service]
Type=forking
LimitNOFILE=65536
ExecStart=/opt/nexus/$NEXUSDIR/bin/nexus start
ExecStop=/opt/nexus/$NEXUSDIR/bin/nexus stop
User=nexus
Restart=on-abort
[Install]
WantedBy=multi-user.target
EOT
echo ‘run_as_user=”nexus”’ > /opt/nexus/$NEXUSDIR/bin/nexus.rc
systemctl daemon-reload
systemctl start nexus
systemctl enable nexus
Sonar Instance
And for Sonar Instance with Ubuntu 18 operating system and with t2.medium Instance Type, make sure you select the same key pair and security group that we have created earlier i.e (trymycode-ci-key) & (sonar-sg) and copy this script in the user data named as sonar-setup.sh of Nexus instance or you can SSH to the instance create .sh file inside your instance copy this script into it and run from the instance. You can also get the script file in user data folder on my git hub repo i.e (https://github.com/satishankalap/ci-jenkins.git)
#!/bin/bash
cp /etc/sysctl.conf /root/sysctl.conf_backup
cat <<EOT> /etc/sysctl.conf
vm.max_map_count=262144
fs.file-max=65536
ulimit -n 65536
ulimit -u 4096
EOT
cp /etc/security/limits.conf /root/sec_limit.conf_backup
cat <<EOT> /etc/security/limits.conf
sonarqube — nofile 65536
sonarqube — nproc 409
EOT
sudo apt-get update -y
sudo apt-get install openjdk-11-jdk -y
sudo update-alternatives — config java
java -version
sudo apt update
wget -q https://www.postgresql.org/media/keys/ACCC4CF8.asc -O — | sudo apt-key add -
sudo sh -c ‘echo “deb http://apt.postgresql.org/pub/repos/apt/ lsb_release -cs-pgdg main” >> /etc/apt/sources.list.d/pgdg.list’
sudo apt install postgresql postgresql-contrib -y
#sudo -u postgres psql -c “SELECT version();”
sudo systemctl enable postgresql.service
sudo systemctl start postgresql.service
sudo echo “postgres:admin123” | chpasswd
runuser -l postgres -c “createuser sonar”
sudo -i -u postgres psql -c “ALTER USER sonar WITH ENCRYPTED PASSWORD ‘admin123’;”
sudo -i -u postgres psql -c “CREATE DATABASE sonarqube OWNER sonar;”
sudo -i -u postgres psql -c “GRANT ALL PRIVILEGES ON DATABASE sonarqube to sonar;”
systemctl restart postgresql
#systemctl status -l postgresql
netstat -tulpena | grep postgres
sudo mkdir -p /sonarqube/
cd /sonarqube/
sudo curl -O https://binaries.sonarsource.com/Distribution/sonarqube/sonarqube-8.3.0.34182.zip
sudo apt-get install zip -y
sudo unzip -o sonarqube-8.3.0.34182.zip -d /opt/
sudo mv /opt/sonarqube-8.3.0.34182/ /opt/sonarqube
sudo groupadd sonar
sudo useradd -c “SonarQube — User” -d /opt/sonarqube/ -g sonar sonar
sudo chown sonar:sonar /opt/sonarqube/ -R
cp /opt/sonarqube/conf/sonar.properties /root/sonar.properties_backup
cat <<EOT> /opt/sonarqube/conf/sonar.properties
sonar.jdbc.username=sonar
sonar.jdbc.password=admin123
sonar.jdbc.url=jdbc:postgresql://localhost/sonarqube
sonar.web.host=0.0.0.0
sonar.web.port=9000
sonar.web.javaAdditionalOpts=-server
sonar.search.javaOpts=-Xmx512m -Xms512m -XX:+HeapDumpOnOutOfMemoryError
sonar.log.level=INFO
sonar.path.logs=logs
EOT
cat <<EOT> /etc/systemd/system/sonarqube.service
[Unit]
Description=SonarQube service
After=syslog.target network.target
[Service]
Type=forking
ExecStart=/opt/sonarqube/bin/linux-x86–64/sonar.sh start
ExecStop=/opt/sonarqube/bin/linux-x86–64/sonar.sh stop
User=sonar
Group=sonar
Restart=always
LimitNOFILE=65536
LimitNPROC=4096
[Install]
WantedBy=multi-user.target
EOT
systemctl daemon-reload
systemctl enable sonarqube.service
#systemctl start sonarqube.service
#systemctl status -l sonarqube.service
apt-get install nginx -y
rm -rf /etc/nginx/sites-enabled/default
rm -rf /etc/nginx/sites-available/default
cat <<EOT> /etc/nginx/sites-available/sonarqube
server{
listen 80;
server_name sonarqube.groophy.in;
access_log /var/log/nginx/sonar.access.log;
error_log /var/log/nginx/sonar.error.log;
proxy_buffers 16 64k;
proxy_buffer_size 128k;
location / {
proxy_pass http://127.0.0.1:9000;
proxy_next_upstream error timeout invalid_header http_500 http_502 http_503 http_504;
proxy_redirect off;
proxy_set_header Host \$host;
proxy_set_header X-Real-IP \$remote_addr;
proxy_set_header X-Forwarded-For \$proxy_add_x_forwarded_for;
proxy_set_header X-Forwarded-Proto http;
}
}
EOT
ln -s /etc/nginx/sites-available/sonarqube /etc/nginx/sites-enabled/sonarqube
systemctl enable nginx.service
#systemctl restart nginx.service
sudo ufw allow 80,9000,9001/tcp
echo “System reboot in 30 sec”
sleep 30
reboot
This is just the beginning of this project we will see all the Post installation setups in part 2 of this project make sure you setup everything accordingly.
Any Queries just reach out on LinkedIn or mention your comments below.
LinkedIn : https://www.linkedin.com/in/satish-ankalap-295662125/